The Ultimate Meat Doneness Guide + Internal Temperature Chart (Cook Every Meal Perfectly!)
This post may contain affiliate links. If you click and make a purchase, I may receive a small commission, at no extra cost to you. Thank you for supporting Our Hungry Home!
Never Guess Again: Your Go-To Meat Doneness Guide
Have you ever cut into a beautiful piece of meat… only to find it undercooked—or worse, dry and overdone?
We’ve all been there.
Cooking meat to the perfect doneness can feel intimidating, especially when different cuts, cooking methods, and safety guidelines all come into play. But here’s the good news: once you understand internal temperatures, everything gets easier.
This guide will walk you through:
- Safe internal temperatures
- Doneness levels for beef
- Tips for juicy, flavorful results every time
- A simple chart you can save, print, or pin
Let’s take the guesswork out of dinner.
Tools You’ll Need (Make It Effortless)
Putting together a summer evening dinner or family backyard bbq can be fun and delicious — and a few simple tools can make all the difference:
- A Meat Thermometer for getting exact temperatures for doneness.
- Grilling Tool Set makes grilling so much easier to have the right tool for the right job.
- A Grill Topper perfect for cooking shrimp and smaller items so they won’t fall into the fire.
- A Grill – you can’t really grill meat without one! This one has a spacious cooking area (enough to cook 24 burgers)
- A Grill Cover that is waterproof to protect your new grill from the weather when not in use.
Why Internal Temperature Matters
When it comes to cooking meat, appearance alone isn’t reliable. Color, texture, and even juices can be misleading.
Using a thermometer ensures:
- Food safety (especially for chicken and ground meats)
- Perfect texture (tender vs. tough)
- Juicy results (not dried out!)
Think of internal temperature as your kitchen secret weapon.
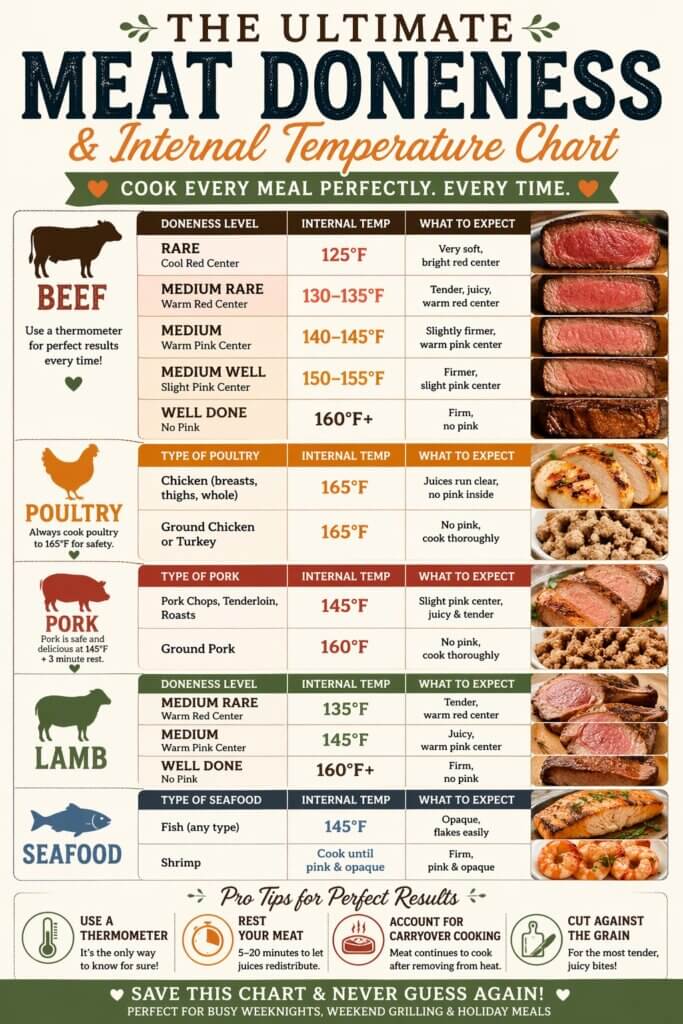
Safe Internal Temperature Chart (Quick Reference)
Here’s your go-to cheat sheet:
Poultry
- Chicken (breasts, thighs, whole): 165°F
- Ground chicken or turkey: 165°F
Beef
- Rare: 125°F
- Medium Rare: 130–135°F
- Medium: 140–145°F
- Medium Well: 150–155°F
- Well Done: 160°F+
Pork
- Pork chops, tenderloin, roasts: 145°F (rest 3 minutes)
- Ground pork: 160°F
Lamb
- Medium Rare: 135°F
- Medium: 145°F
- Well Done: 160°F
Seafood
- Fish: 145°F
- Shrimp: Cook until pink and opaque
👉 Tip: Meat continues to cook after you remove it from heat—this is called “carryover cooking.” Always pull it a few degrees early!
Check out this OXO Softworks Digital Instant Thermometer! Temperature accuracy at your fingertips. Take the guesswork out of cooking with the OXO Softworks Digital Instant Thermometer. Its digital display ensures accurate and fast temperature readings, so you can cook with confidence.
Download this FREE Printable NOW!
Understanding Beef Doneness (So You Get It Exactly Right)
When it comes to steak, doneness is everything.
Rare (Cool Red Center)
- Temp: 125°F
- Texture: Very soft
- Best for: High-quality cuts like ribeye or filet
Medium Rare (Warm Red Center)
- Temp: 130–135°F
- Texture: Tender and juicy
- ⭐ This is the chef’s gold standard
Medium (Warm Pink Center)
- Temp: 140–145°F
- Texture: Slightly firmer, still juicy
Medium Well (Slight Pink)
- Temp: 150–155°F
- Texture: Firmer, less juice
Well Done (No Pink)
- Temp: 160°F+
- Texture: Firm, can become dry
👉 If you’re unsure, aim for medium rare to medium—it’s the sweet spot for flavor and tenderness.
Chicken Done Right (Without Drying It Out)
Chicken is where food safety matters most.
- Always cook to 165°F
- Juices should run clear
- No pink inside
But here’s the secret:
Don’t overcook past 165°F, or it will dry out quickly.
Pro Tips for Juicy Chicken
- Let it rest before slicing
- Use a meat thermometer (not guesswork!)
- Cook evenly (pound thicker pieces if needed)
Pork: The Most Misunderstood Meat
For years, pork was overcooked out of caution—but that’s no longer necessary.
Modern Guideline
- Safe at 145°F + 3-minute rest
This gives you:
- Slight blush of pink
- Tender, juicy texture
- Much better flavor
Ground pork still needs to reach 160°F.
How to Use a Meat Thermometer (Like a Pro)
If you don’t already have one, this is your sign—it’s a total game changer.
Check out this OXO Softworks Digital Instant Thermometer. Temperature accuracy at your fingertips. Take the guesswork out of cooking with the OXO Softworks Digital Instant Thermometer. Its digital display ensures accurate and fast temperature readings, so you can cook with confidence.
Where to Insert It
- Thickest part of the meat
- Avoid bone or fat
When to Check
- Near the end of cooking
- Double-check multiple spots for large cuts
Best Types
- Instant-read (fast and easy)
- Digital probe (great for oven cooking)
The Secret to Perfect Meat: Resting Time
One of the most overlooked steps? Letting your meat rest.
Why It Matters
- Juices redistribute throughout the meat
- Prevents dryness when slicing
General Rule
- Small cuts: 5 minutes
- Larger cuts/roasts: 10–20 minutes
👉 Skipping this step = losing all those flavorful juices on your cutting board!
Common Mistakes to Avoid
Let’s save you from the most common kitchen frustrations:
❌ Cutting too early
➡️ Juices run out → dry meat
❌ Cooking by color alone
➡️ Not accurate or safe
❌ Overcooking “just to be safe”
➡️ Leads to tough, dry meat
❌ Not accounting for carryover cooking
➡️ Meat overshoots ideal doneness
Make This Chart Work for You
This Meat Doneness + Internal Temp Chart is perfect for:
- Printing and keeping in your kitchen
- Saving on your phone for quick reference
- Pinning to your Pinterest boards
- Adding to your weekly meal prep routine
It’s one of those tools you’ll use over and over again.
Final Thoughts: Confidence in the Kitchen Starts Here
Cooking meat perfectly doesn’t have to feel complicated.
With just a simple thermometer and a little know-how, you can:
- Serve safer meals
- Lock in flavor and juices
- Feel confident every time you cook
And once you get the hang of it? You’ll never go back to guessing.
Looking for more grilling or cooking inspiration?
This post pairs perfectly with these complementary posts:
- Everyday Spices Guide
- Flavor Pairings
- Fresh Herbs 101
- Potatoes 101 Guide (who doesn’t love a good side dish of potatoes to go with perfectly cooked steak or burgers?)
- Spring & Summer Produce Guide
- Grilling and Barbecuing + 5 Easy Recipes combine the two to create endless easy meal ideas for your home.
Combine any or all of these to create endless easy meal ideas for your family and friends.